Monday, October 13, 2008

And Now For Something Completely Different!

Well, tomorrow's the big day - Birthday #42! Figuring that I would "treat" myself, I opted for something completely different; something I've never tried before. I have decided to initiate myself into the world of Micro RC! This makes good sense to me, as I have been looking for that perfect plane that I can fly in the front yard, fly in our small gymnasium during the Winter months, and even have something small enough that I can pack away in one of my saddlebags on my Honda VTX 1800 (Hey! Wouldn't it be great to be able to enjoy TWO of my favorite pastimes in one afternoon?).

I have been looking at Plantraco's wares (www.plantraco.com) for some time, but the cost of the equipment has been just out of my reach. I don't doubt that the stuff is great - if it wasn't, you wouldn't see so many of their products out there!

Termite (on RCGroups) is one of my favorite sellers. This last weekend, he advertised a complete package consisting of a P-51 kit, HXF900 Transmitter, actuators, batteries, a motor, and props. I couldn't pass up the price of $120 for the whole package!

It looks as though the plane is constructed of some very thin (0.025") depron with some carbon fiber to add strength to the fuselage. The wingspan is only 10" and has an AUW of about 12 grams, but the manufacturer claims that the plane can be flown in winds as high as 15mph. I was a bit doubtful, but after seeing some videos of the plane flying in heavy winds, I was sold on it.

This set up allows for RET control and uses actuators instead of servos. I am expecting a serious challenge in building this little thing, as I have very large hands and the typical growing inability to see things that are tiny (stupid middle-age! lol ), but replacement kits are only $15 so if I trash it during the build, I should be able to just get another and try again!

The radio system included in this package is quite intriguing. It is a 900 megahertz system that will offer about a 300' range - plenty for navigating a 10" model around. The radio allows for charging, similar to what so many of the Air Hogs branded toys are doing these days.

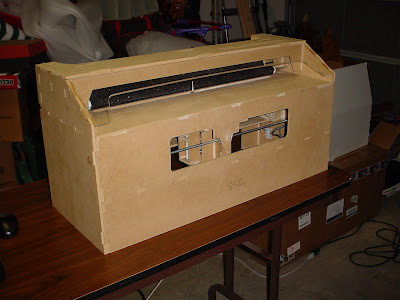
If I can manage to get a good build on this one, I fully expect to be able to work up a small case where I can safely store the plane, radio, and whatever other items I want to carry, for transportation in my saddlebag.

I should be receiving the package in the next week, or so. I'll post pics of my progress and let all of you know what I think of it! Picture below is courtesy of Plantraco's website.

Friday, October 3, 2008

RCFlightCast WebSite Gets FORUMS!!

Frank and Brian have added a new Forums section to the RCFlightCast website! This is so cool! And, get this, they put in a section for threads dedicated to posts specifically for the PhlatPrinter!!

Perhaps some of you that have been following the PhlatPrinter threads that were in the RCGroups "Foam Scratchbuilder" area found that RCGroups' Moderators found it necessary to move the Introduction Thread and my Build Thread out of that section and into the General "Builders Workshop" area. Heck, they even moved the PhlatCodez Thread there, too! After many people complained, the finally moved that one back to the Scratchbuilders thread, since it contained the gCode files for people to cut out scratch-built planes. I guess I can understand why they moved the other two threads, but nonetheless, traffic to those valuable threads has dimished significantly. I expect that some people don't even know where the threads were moved to!

Anyway, now all of us PhlatFanz have a place we can call home with no fear of moved threads, and such. I really hope that this new forum board takes off and becomes the "hub" for all of us!

There are some general discussion areas on this forum, as well as places for us to talk about the other podcasts that we are fans of!

Slide on over there and check out the new forums!

RCFlightCast

Monday, September 29, 2008

PhlatPrinter: Update - Making Planes Now!

A couple of days ago, the Ruby-scripted Plug-In was released from The PhlatBoyz! This set of tools allows you t0 create gCode for your aircraft (or whatever else you would like to cut on your PhlatPrinter) that you have worked up in Google's SketchUp. Without this Plug-In, you are forced to work up your design in a commercial CAD application, save it as DXF, then import your DXF file into a commercial CAM program to create the gCode. While this is an effective workflow, the Google SketchUp workflow is much better, as SketchUp is free, the Plug-In is free, and if your design isn't too complex, you can even use the free demo version of Mach3! I like free! lol

After watching the tutorial for the Plug-In completely through, I gained enough knowledge of it's use to get started. I watched the tutorial a second time, only this time I went step by step, pausing the video several times along the way.

Since I already had a DXF file worked up for the parts for Tony65x55's BluBaby 24 airplane, I chose this to do the shakedown of the Plug-In. This proved to be a great file to use, since the parts for this airplane all required an "outside cut". After working the file up and saving out the gCode, I ended up with this little jewel!


Not bad, eh? Following my old workflow, it would have taken me at least two hours to get to this point with printing out tiled plans, putting the tiles together like a puzzle and taping them up, cutting out the templates for each part, using those paper part templates to get the foam pieces cut out, and then finally the build of the plane. Using my PhlatPrinter, it took 23 minutes to cut out the plane. The build time was only about 15 minutes, and the gCode preparation was only about 10 minutes. Result? I shaved off about an hour of time on this project using the PhlatPrinter and it's workflow. Not a big time savings, but when you factor in that the hour that I shaved off was the most frustrating part of any build - the cutting out of the foam parts using paper templates! Now, if I decide to build another for myself or a friend, it will take even less time to complete since I already have the gCode processed and saved! It's now just a matter of loading a sheet of foam in the PhlatPrinter, loading the gCode in Mach3, hitting the "print" button, and waiting 23 minutes for all the pieces of the next one!

My next project was an easy choice. Since the indoor flying season is fast approaching, I wanted to get another of SloperSteve's SloFly Micro 22's in the air. This was a great test for the Plug-In (and my skills with it!) since the parts required "inside cuts" and it allowed me to use the "fold" tool, which is where you set up the cut to be a percentage of the foam's thickness, rather than cutting completely through. Again, prep time of the file to get it ready to write the gCode out was less than 10 minutes! My hat goes off to Pete (the programmer of the script) for a tool package so simple that even I can get it figured out so quickly!

Because this is such a small airplane (only 22" wingspan), I was able to lay the parts out to utilize only a half sheet of FanFoldFoam (FFF). The cut time for this file was only 9:52 - less than 10 minutes to have all the pieces to one of the greatest indoor and backyard flyers in the world!

Rather than having the machine cut out the ailerons and elevator, I elected to only "score" those parts at 50% depth using the "fold" tool. The scores turned out great, giving me a guide to cut out those pieces by hand. All I can say here is WOW!


Since this is such a great little plane, and I figure everyone should own one, I wrote another gCode file out so that I can now cut the parts for TWO of these planes out of one sheet of foam. That way, I will have a spare plane next time I cut one out and can give it away to a friend!

Mere words cannot express my satisfaction with this purchase! The PhlatPrinter (www.phlatboyz.com) is truly the scratchbuilder's new best friend! Even if you don't like the designing aspect of flying foamie airplanes, you should consider building one of these machines. As the PhlatBoyz customer base grows, more and more free gCode files will become available. This means that there is going to be a large list of free gCodes for you to choose your next airplane from very soon!

If you are already a Google SketchUp user (or you just want to download the application and take a look at my files - hey the application is free, after all!), you can go to Google's 3D Warehouse and search for my files. You can download everything there for free and see how this stuff works! My files are uploaded under the name "Crash-Man", but if you do a search for "PhlatPrinter" you will find mine and others that have been set up for this process.

Fun stuff ahead!!!

Saturday, September 13, 2008

PhlatPrinter! It's Here and It's Finished!


Rather than duplicating all of the information that I have already typed up in my review of this awesome machine, I am just gonna provide a link to the thread that I have started.

IT'S AWESOME!!!!

http://www.rcgroups.com/forums/showthread.php?t=923747

Monday, September 1, 2008

My New Workbench

Well, Labor Day is here, but I am stuck at the house again. The wife got called away to work today so I won't be able to sneak out for some flying. This weekend, however, was quite fruitful as I finally took the time to build a new and much needed workbench! Below are a few pictures of it, as well as my work area for you all to enjoy.


For the last 7 years in this house, my workbench has consisted of two 55 gallon drums with a folded up 2' x 6' table on top with a 32" x 80" luan door on top of that! It provided a nice workspace for building, but looked quite "Mickey Mouse"! LOL

With the impending delivery of my new PhlatPrinter (from www.PhlatBoyz.com) CNC machine, I really needed that table to put the CNC machine and my computer on, so I decided that it was finally time to get that "real" workbench built!

The whole thing cost me only $40 to build and I was able to recess in the door that I already had. I designed it to fit nicely with the pegboard that I already installed on the walls to hold all of my junk. If you've been in search of a nice and flat building surface to construct your planes on, consider getting a luan door like the one that I use. It is cheap (only $18) and provides the flattest surface for the least amount of dough. You may also be able to see the piece of tempered glass that I have on the bench. I have it taped off with black duct tape around the edges because the piece that I have has sharp edges and the tape helps to keep the cut fongers at bay. I have been building on glass for years because it protect your bench from glue build up and when you do get glue all over it, you can just take a razor and scrape it all off and it's like new again.

The lighting in this corner of my garage is quite scarce, so I went in search of some good, cheap lighting to make this space more usable. I ended up getting a garage-style drop light from the local Dollar General store for only $4. It's all plastic and really not what I would consider a good drop light for garage use, but I removed the cage over the light and installed a 100 watt florescent bulb and hung the light directly over the bench. Now light is no problem and the bulb doesn't build up very much heat at all, not to mention energy usage! My wife and I have been working really hard to make our home more "green" with exclusive use of the florescent bulbs as well as recycling everything we can. The use of these bulbs, which I'd like to note are dropping in price nicely, have helped us to drop our electric bill by $50 to $75 per month! Furthermore, the incandescent bulbs that we used to use were going out every 3 - 6 months (power surges??) and I'm happy to report that I have not had to replace a single florescent bulb in the last 16 months since we changed to these!

In one of the pictures, you can see my table o' power tools. I don't use them on this table, though. I have a WorkMate table and when I need one of my tools, I pick it up from the table and put it on the WorkMate for use. When I'm done, I put it back on the table and grab the next tool. I am really thinking of getting another workmate so that I can use two tools at a time!

Anyway, I hope you've enjoy a little glimpse into my building world. I have been trying to post at least once a week to this blog, but with the PhlatPrinter Premium kit to arrive this week, I will be spending alot of time in this area with many posts and pics in this blog to cover the entire build process!

Stay Tuned!

Monday, August 18, 2008

What?? Rained Out??

Yep, you read that right! We are having some rather unseasonal weather here in Waco, Texas.

Normally, this time of year yields 100+ degree days with absolutely no end in sight to the heat. However, it's actually 73 degrees here right now (a temperature that we see if we're extremely LUCKY as the day's low) and raining buckets!

Although yesterday would have been a nice day to get some flying in, I had some family responsibilities that had to take the front seat (buying school clothes and supplies and such to get ready for some First Grade action) to my enjoyment. I figured, what the heck! The wife doesn't work this Monday, so I'll get to go out then...

Well, my next opportunity will be Thursday. If not then, I can get some time next weekend.

Rain is forecast right now through Saturday! Who'd have thunk it!?

Sunday, August 10, 2008

Blu Baby 33: Progress Report

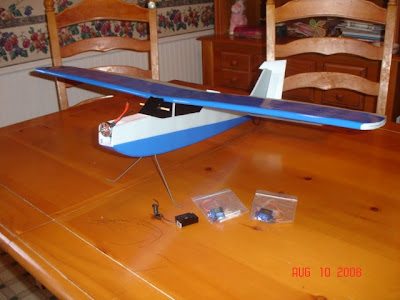
Man, it's been a hectic week! Family responsibilities have kept me from getting my "fix", but I was able to make a little progress on my AP plane. I thought I'd post a few pics to let you guys know what progress I've made thus far.

I got a motor in! I got a custom wound Blue Wonder from timocharis at RCGroups. Wow! This guy can wind a motor! It should provide plenty of power for this airplane, yet with the proper prop selection (I'm thinking a 7x3.5 GWS) it should have a very low amp draw meaning long flight times!

I decided to pull out the old Zagi tape and dress the plane up a bit, as you can see. I have various colors of the tape, but decided that blue kinda kept with the plane's name.

Unfortunately, I am kind of at a stand still with this plane for now, as I am in need of some light 1.5" wheels as well as push-rod stock. The wife is in the middle of an 11 day stint at the hospital, so I'm pretty much stuck in the house until next Saturday with this kids (I DON'T take them to the hobby ship with me! lol). I could "make" some wheels out of some 12mm EPP that I have, but I think I'll just wait. I expect my local hobby shop to have some nice wheels to choose from, and since I hafta make a trip anyway....

I've pretty much decided to go ahead and mount the servos externally. The area in the fuselage is ample, but really too tight for my big old hands. I am thinking that if I mount them on the outside, I can put my battery on the inside where the servos would normally go. This will leave the battery compartment on the bottom open, and a great place to put in my FlyCamOne keeping it fully protected in case the landing gear decides to go south on a less than perfect landing! It is also conducive to the camera shooting straight down, which is the angle I want for AP (don't you just hate seeing the propellor "bands" that show up when you get the prop in the frame?).

A few weeks ago I put the "sitemeter" tag on this blog to see how many people are following me. From the stats that I've been seeing, it appears that I have a pretty good following, so I am gonna try to post a little more often so that I don't dissapoint!

Thanks to all for following my little adventures in this hobby. I am hoping to have some fair AP footage for you all to see very soon!

Until next time!