I want to thank all of you that took the time to share with me your thoughts on my starting my own RC-related podcast. I am amazed at the response!! I've read tons of emails from you guys telling me to move forward with this project, but not a single one telling me "Hey man, just stop already!".
I have been busy working up a format that will be informative and, hopefully, enjoyable. I am, however, stumped over what to name this thing!
If you have any suggestions on a name for my new show, please feel free to drop me an email.
Many thanks for your support!!
Thursday, December 25, 2008
Thursday, December 18, 2008
One Door Closes, Another Opens?
As some of you have noticed, I will no longer be a fixture on RCFlightCast. Frank and Brian have decided to change the format back to be more of a father-and-son show.
I have received some very nice emails from some of you that have told me that I'll be missed. I am very thankful for your sentiments. I really enjoyed playing my small part in RCFC and have established many friendships because of that opportunity.
Before I hooked up with RCFC, I was seriously contemplating starting my own podcast. You see, the Radio Control Hobby is almost like a religion with me. I never miss an opportunity to share my hobby with anyone that will listen, or anyone interested in learning to fly. It's just so much fun and I enjoy helping out any way I can so that others can enjoy the hobby as I do!
The question I have for anyone reading this is:
Is there interest out there in another RC- and CNC-related podcast hosted by yours truly?
If so, I will acquire the server space and get started putting something together right away. If not, then I won't pursue it.
Please feel free to email me directly at Crash.Hancock(AT)gmail.com.
Thursday, November 20, 2008
An Overdue Update...
Man, life has been busy in the last few weeks!
First off, I have been working on a really cool Speed 400 Racer that I have named Any's LanceAir. AnyAirRC designed it for me, and I think it resembles a Lancair, hence the name. It has a 28" wingspan (with a KFm4), is made entirely from FFF cut on my PhlatPrinter, and will utilize the Park Jet Combo (2212-06 V2) from Grayson Hobby. With a 6x4 prop, speeds of around 80mph should be easily attained! I am planning on using a 3S 1000 Zippy LiPo battery for it, as well as some good 9gram servos. I haven't finished it yet, as the weather here in Central Texas has turned and if we're not dealing with winds, then we're dealing with cold. I am hoping to finish it and get a maiden flight in within the next couple of weeks.

My time has also been quite consumed with another endeavor. I think that there are quite a few people that have been struggling with learning to use Google's SketchUp for working up their planes to cut on the PhlatPrinter. While I am certainly no expert with this application, I have learned to do a few things. I decided to put together a series of tutorials to help my fellow PhlatPrinter enthusiasts. I downloaded a Demo copy of Camstasia Studio 6, and it has proved to be a great application for capturing what I'm doing on my screen as well as allowing me to record audio simultaneously.
So far I have worked up 8 videos. I've tried to develop a curriculum that's very easy to follow and I've been keeping the videos on the short side to allow the viewer to absorb smaller nuggets of information at a time without getting swamped by tons of instruction all at once. The shorter videos also allow me a more managable file size when uploading!
At first, I uploaded the videos to YouTube, but after they downsample the crap out of my work, you could barely see what I had going on, so I have moved the videos over to Vimeo. They don't downsample as harshly, and they also allow you to download the videos to your computer and play them with QuickTime directly from your machine (no waiting on buffering!).
I call this instructional series PhlatPrinter SketchUp Basics - Getting Started. Following is a list of what each video covers:
Video 1 - File Organization And Creating Your Template
Video 2 - Creating A Parts Layout Reference
Video 3 - Using The PhlatScript PlugIn Part 1
Video 4 - Using The PhlatScript PlugIn Part 2
Video 5 - Generating PhlatCode
Video 6 - Importing DWG/DXF CAD Files
Video 7 - Cleaning Up The DWG/DXF CAD Import Part 1
Video 8 - Cleaning Up The DWG/DXF CAD Import Part 2
You can access my videos by clicking the following link:
http://www.vimeo.com/user945475/videos
There are a few more topics that I would like to cover in the Getting Started series, but it will probably be next week before I can get to them. After that, I am hoping to put together an "Advanced" series. Of course, I need to learn more of the advanced techniques before I can teach them! lol
Sunday, November 9, 2008
HandyCam Update
So, as I mentioned earlier, I have been trying to get my Sony Digital8 HandyCam (Thanks again, Mark and Trish!) to interface with my Mac so I can push some video up to YouTube. I am happy to report that I have finally been able to get this thing to work!
It turns out that the problem was with my FireWire cable! The first one I bought was a 4 pin to 6 pin cable. Since it was "no-worky", and I had read on the interwebs that some of the older Sony cameras were hit and miss with Mac computers, I decided to buy a second cable (4 pin to 4 pin) to see if I could get things to work on my PC. It was still no bueno!
The eBay seller that I got the first cable from sent me an email and said that some of the cables that they sent out were bad and that I should expect a new cable to arrive shortly. It came in Friday and I tried it on the Mac yesterday. Success!!! It turns out that the first cable was, indeed, bad.
Last night, I sent an email to the supplier that sold me the cable for my PC; I told them that it appeared to be defective as well, so they have agreed to send me another cable for free. I actually prefer doing video editing on my Mac, but since she's an older laptop and I don't want to risk killing her on video processing, I want to do my editing on my trusty Alienware laptop. It's a much more robust machine and I spec'ed it out with video processing capabilities in mind when I ordered it.
I should be receiving that new PC cable in the next week, or so, but in the meantime I plan to push the old Mac iBook, but I will be keeping the videos very short.
If there are any "Foamie Build Tips" that you would like to request, please feel free to email me and I'll see what I can do for you! My email is crash.hancockATgmail.com (I expect you know what to do to that email addy to get it to go through).
Saturday, November 1, 2008
Updates: No, I'm Not Missing!
I want to apologize to those who may think I've dropped off the face of the Earth. Life has been very busy this Fall and I've been kind of emerged in some other projects lately.
First off, I got my Plantraco setup in, but haven't had time to even take any pictures of it to show off here. I am hoping to start the build before too much longer.
Second, project "PhlatPrinter" is moving along great. The machine just works and works without any problems encountered whatsoever. In fact, I have a few projects to get cut for some friends in various parts of the country!
Third, all of my free time here lately has been taken up by researching all different forms of CNC Routers out there. I am hoping to start the build of a new machine just after the first of the new year, so I've been trying to learn all that I can to make this build successful right out of the gate. I am looking to build a full-motion gantry flatbed machine with a cutting area of 2' x 4'. This should allow me to capture all of those projects I want to cut that my trusty old PhlatPrinter cannot (balsa cuts, flight boxes, etc.). When I start this build, I will be covering all aspects of the build right here!
Finally, I have been working hard to figure out how I can get my new HandyCam to properly interface with my PC or Mac so that I can get some good video on the web for all that I can see. My hopes are to put together a series of video blogs that will show you guys some of my build techniques and such. It looks as though this camera may have a bad firewire port, as I cannot get it to work no matter what I do. That being said, it looks like I am still on the hunt for an inexpsensive video camera with Firewire capability.
Please be patient - I will have some projects available here soon!
Monday, October 13, 2008
And Now For Something Completely Different!
Well, tomorrow's the big day - Birthday #42! Figuring that I would "treat" myself, I opted for something completely different; something I've never tried before. I have decided to initiate myself into the world of Micro RC! This makes good sense to me, as I have been looking for that perfect plane that I can fly in the front yard, fly in our small gymnasium during the Winter months, and even have something small enough that I can pack away in one of my saddlebags on my Honda VTX 1800 (Hey! Wouldn't it be great to be able to enjoy TWO of my favorite pastimes in one afternoon?).
I have been looking at Plantraco's wares (www.plantraco.com) for some time, but the cost of the equipment has been just out of my reach. I don't doubt that the stuff is great - if it wasn't, you wouldn't see so many of their products out there!
Termite (on RCGroups) is one of my favorite sellers. This last weekend, he advertised a complete package consisting of a P-51 kit, HXF900 Transmitter, actuators, batteries, a motor, and props. I couldn't pass up the price of $120 for the whole package!
It looks as though the plane is constructed of some very thin (0.025") depron with some carbon fiber to add strength to the fuselage. The wingspan is only 10" and has an AUW of about 12 grams, but the manufacturer claims that the plane can be flown in winds as high as 15mph. I was a bit doubtful, but after seeing some videos of the plane flying in heavy winds, I was sold on it.
This set up allows for RET control and uses actuators instead of servos. I am expecting a serious challenge in building this little thing, as I have very large hands and the typical growing inability to see things that are tiny (stupid middle-age! lol ), but replacement kits are only $15 so if I trash it during the build, I should be able to just get another and try again!
The radio system included in this package is quite intriguing. It is a 900 megahertz system that will offer about a 300' range - plenty for navigating a 10" model around. The radio allows for charging, similar to what so many of the Air Hogs branded toys are doing these days.
If I can manage to get a good build on this one, I fully expect to be able to work up a small case where I can safely store the plane, radio, and whatever other items I want to carry, for transportation in my saddlebag.
I should be receiving the package in the next week, or so. I'll post pics of my progress and let all of you know what I think of it! Picture below is courtesy of Plantraco's website.

Friday, October 3, 2008
RCFlightCast WebSite Gets FORUMS!!
Frank and Brian have added a new Forums section to the RCFlightCast website! This is so cool! And, get this, they put in a section for threads dedicated to posts specifically for the PhlatPrinter!!
Perhaps some of you that have been following the PhlatPrinter threads that were in the RCGroups "Foam Scratchbuilder" area found that RCGroups' Moderators found it necessary to move the Introduction Thread and my Build Thread out of that section and into the General "Builders Workshop" area. Heck, they even moved the PhlatCodez Thread there, too! After many people complained, the finally moved that one back to the Scratchbuilders thread, since it contained the gCode files for people to cut out scratch-built planes. I guess I can understand why they moved the other two threads, but nonetheless, traffic to those valuable threads has dimished significantly. I expect that some people don't even know where the threads were moved to!
Anyway, now all of us PhlatFanz have a place we can call home with no fear of moved threads, and such. I really hope that this new forum board takes off and becomes the "hub" for all of us!
There are some general discussion areas on this forum, as well as places for us to talk about the other podcasts that we are fans of!
Slide on over there and check out the new forums!
RCFlightCast
Monday, September 29, 2008
PhlatPrinter: Update - Making Planes Now!
A couple of days ago, the Ruby-scripted Plug-In was released from The PhlatBoyz! This set of tools allows you t0 create gCode for your aircraft (or whatever else you would like to cut on your PhlatPrinter) that you have worked up in Google's SketchUp. Without this Plug-In, you are forced to work up your design in a commercial CAD application, save it as DXF, then import your DXF file into a commercial CAM program to create the gCode. While this is an effective workflow, the Google SketchUp workflow is much better, as SketchUp is free, the Plug-In is free, and if your design isn't too complex, you can even use the free demo version of Mach3! I like free! lol
After watching the tutorial for the Plug-In completely through, I gained enough knowledge of it's use to get started. I watched the tutorial a second time, only this time I went step by step, pausing the video several times along the way.
Since I already had a DXF file worked up for the parts for Tony65x55's BluBaby 24 airplane, I chose this to do the shakedown of the Plug-In. This proved to be a great file to use, since the parts for this airplane all required an "outside cut". After working the file up and saving out the gCode, I ended up with this little jewel!

Not bad, eh? Following my old workflow, it would have taken me at least two hours to get to this point with printing out tiled plans, putting the tiles together like a puzzle and taping them up, cutting out the templates for each part, using those paper part templates to get the foam pieces cut out, and then finally the build of the plane. Using my PhlatPrinter, it took 23 minutes to cut out the plane. The build time was only about 15 minutes, and the gCode preparation was only about 10 minutes. Result? I shaved off about an hour of time on this project using the PhlatPrinter and it's workflow. Not a big time savings, but when you factor in that the hour that I shaved off was the most frustrating part of any build - the cutting out of the foam parts using paper templates! Now, if I decide to build another for myself or a friend, it will take even less time to complete since I already have the gCode processed and saved! It's now just a matter of loading a sheet of foam in the PhlatPrinter, loading the gCode in Mach3, hitting the "print" button, and waiting 23 minutes for all the pieces of the next one!
My next project was an easy choice. Since the indoor flying season is fast approaching, I wanted to get another of SloperSteve's SloFly Micro 22's in the air. This was a great test for the Plug-In (and my skills with it!) since the parts required "inside cuts" and it allowed me to use the "fold" tool, which is where you set up the cut to be a percentage of the foam's thickness, rather than cutting completely through. Again, prep time of the file to get it ready to write the gCode out was less than 10 minutes! My hat goes off to Pete (the programmer of the script) for a tool package so simple that even I can get it figured out so quickly!
Because this is such a small airplane (only 22" wingspan), I was able to lay the parts out to utilize only a half sheet of FanFoldFoam (FFF). The cut time for this file was only 9:52 - less than 10 minutes to have all the pieces to one of the greatest indoor and backyard flyers in the world!
Rather than having the machine cut out the ailerons and elevator, I elected to only "score" those parts at 50% depth using the "fold" tool. The scores turned out great, giving me a guide to cut out those pieces by hand. All I can say here is WOW!

Since this is such a great little plane, and I figure everyone should own one, I wrote another gCode file out so that I can now cut the parts for TWO of these planes out of one sheet of foam. That way, I will have a spare plane next time I cut one out and can give it away to a friend!
Mere words cannot express my satisfaction with this purchase! The PhlatPrinter (www.phlatboyz.com) is truly the scratchbuilder's new best friend! Even if you don't like the designing aspect of flying foamie airplanes, you should consider building one of these machines. As the PhlatBoyz customer base grows, more and more free gCode files will become available. This means that there is going to be a large list of free gCodes for you to choose your next airplane from very soon!
If you are already a Google SketchUp user (or you just want to download the application and take a look at my files - hey the application is free, after all!), you can go to Google's 3D Warehouse and search for my files. You can download everything there for free and see how this stuff works! My files are uploaded under the name "Crash-Man", but if you do a search for "PhlatPrinter" you will find mine and others that have been set up for this process.
Fun stuff ahead!!!
Saturday, September 13, 2008
PhlatPrinter! It's Here and It's Finished!

Rather than duplicating all of the information that I have already typed up in my review of this awesome machine, I am just gonna provide a link to the thread that I have started.
IT'S AWESOME!!!!
http://www.rcgroups.com/forums/showthread.php?t=923747
Monday, September 1, 2008
My New Workbench
Well, Labor Day is here, but I am stuck at the house again. The wife got called away to work today so I won't be able to sneak out for some flying. This weekend, however, was quite fruitful as I finally took the time to build a new and much needed workbench! Below are a few pictures of it, as well as my work area for you all to enjoy.


 For the last 7 years in this house, my workbench has consisted of two 55 gallon drums with a folded up 2' x 6' table on top with a 32" x 80" luan door on top of that! It provided a nice workspace for building, but looked quite "Mickey Mouse"! LOL
With the impending delivery of my new PhlatPrinter (from www.PhlatBoyz.com) CNC machine, I really needed that table to put the CNC machine and my computer on, so I decided that it was finally time to get that "real" workbench built!
The whole thing cost me only $40 to build and I was able to recess in the door that I already had. I designed it to fit nicely with the pegboard that I already installed on the walls to hold all of my junk. If you've been in search of a nice and flat building surface to construct your planes on, consider getting a luan door like the one that I use. It is cheap (only $18) and provides the flattest surface for the least amount of dough. You may also be able to see the piece of tempered glass that I have on the bench. I have it taped off with black duct tape around the edges because the piece that I have has sharp edges and the tape helps to keep the cut fongers at bay. I have been building on glass for years because it protect your bench from glue build up and when you do get glue all over it, you can just take a razor and scrape it all off and it's like new again.
The lighting in this corner of my garage is quite scarce, so I went in search of some good, cheap lighting to make this space more usable. I ended up getting a garage-style drop light from the local Dollar General store for only $4. It's all plastic and really not what I would consider a good drop light for garage use, but I removed the cage over the light and installed a 100 watt florescent bulb and hung the light directly over the bench. Now light is no problem and the bulb doesn't build up very much heat at all, not to mention energy usage! My wife and I have been working really hard to make our home more "green" with exclusive use of the florescent bulbs as well as recycling everything we can. The use of these bulbs, which I'd like to note are dropping in price nicely, have helped us to drop our electric bill by $50 to $75 per month! Furthermore, the incandescent bulbs that we used to use were going out every 3 - 6 months (power surges??) and I'm happy to report that I have not had to replace a single florescent bulb in the last 16 months since we changed to these!
In one of the pictures, you can see my table o' power tools. I don't use them on this table, though. I have a WorkMate table and when I need one of my tools, I pick it up from the table and put it on the WorkMate for use. When I'm done, I put it back on the table and grab the next tool. I am really thinking of getting another workmate so that I can use two tools at a time!
Anyway, I hope you've enjoy a little glimpse into my building world. I have been trying to post at least once a week to this blog, but with the PhlatPrinter Premium kit to arrive this week, I will be spending alot of time in this area with many posts and pics in this blog to cover the entire build process!
Stay Tuned!
Monday, August 18, 2008
What?? Rained Out??
Yep, you read that right! We are having some rather unseasonal weather here in Waco, Texas.
Normally, this time of year yields 100+ degree days with absolutely no end in sight to the heat. However, it's actually 73 degrees here right now (a temperature that we see if we're extremely LUCKY as the day's low) and raining buckets!
Although yesterday would have been a nice day to get some flying in, I had some family responsibilities that had to take the front seat (buying school clothes and supplies and such to get ready for some First Grade action) to my enjoyment. I figured, what the heck! The wife doesn't work this Monday, so I'll get to go out then...
Well, my next opportunity will be Thursday. If not then, I can get some time next weekend.
Rain is forecast right now through Saturday! Who'd have thunk it!?
Sunday, August 10, 2008
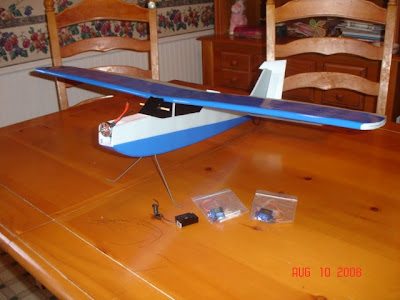
Blu Baby 33: Progress Report
Man, it's been a hectic week! Family responsibilities have kept me from getting my "fix", but I was able to make a little progress on my AP plane. I thought I'd post a few pics to let you guys know what progress I've made thus far.
I got a motor in! I got a custom wound Blue Wonder from timocharis at RCGroups. Wow! This guy can wind a motor! It should provide plenty of power for this airplane, yet with the proper prop selection (I'm thinking a 7x3.5 GWS) it should have a very low amp draw meaning long flight times!
I decided to pull out the old Zagi tape and dress the plane up a bit, as you can see. I have various colors of the tape, but decided that blue kinda kept with the plane's name.
Unfortunately, I am kind of at a stand still with this plane for now, as I am in need of some light 1.5" wheels as well as push-rod stock. The wife is in the middle of an 11 day stint at the hospital, so I'm pretty much stuck in the house until next Saturday with this kids (I DON'T take them to the hobby ship with me! lol). I could "make" some wheels out of some 12mm EPP that I have, but I think I'll just wait. I expect my local hobby shop to have some nice wheels to choose from, and since I hafta make a trip anyway....
I've pretty much decided to go ahead and mount the servos externally. The area in the fuselage is ample, but really too tight for my big old hands. I am thinking that if I mount them on the outside, I can put my battery on the inside where the servos would normally go. This will leave the battery compartment on the bottom open, and a great place to put in my FlyCamOne keeping it fully protected in case the landing gear decides to go south on a less than perfect landing! It is also conducive to the camera shooting straight down, which is the angle I want for AP (don't you just hate seeing the propellor "bands" that show up when you get the prop in the frame?).
A few weeks ago I put the "sitemeter" tag on this blog to see how many people are following me. From the stats that I've been seeing, it appears that I have a pretty good following, so I am gonna try to post a little more often so that I don't dissapoint!
Thanks to all for following my little adventures in this hobby. I am hoping to have some fair AP footage for you all to see very soon!
Until next time!


Saturday, August 2, 2008
Blu Baby 33: Adventures in AP

And now for something completely different! Well, for me, that is. On RCFlightCast (episode #16), we spoke to a gent from Canada that told us all about the Blu Baby Primary Trainer that was designed and shared by a friend of his named Tony65x55 on RCGroups. His name is Jim, and he goes by the screen name of Laserman on RCG. If you haven't listened to this episode, and you are endeavoring to get into the fascinating sport of RC Flying, listen to this episode! This is an inexpensively built aircraft that really suits newb-pilots, and with careful research on the forums ( www.rcgroups.com/forums/showthread.php?t=681556 ), you should be able to break into this great hobby on the cheap and with success!
As a seasoned pilot, I have to say that I have no interest whatsoever in "trainer" aircraft. Since I graduated from my trainer about a bazillion years ago, I have never looked back at these RET (Rudder, Elevator, Throttle) designs. I favor go-where-you-point-it performance! Trainer aircraft, while necessary for learning the coordination for RC flight, are sluggish and offer very little in the aerobatics department. Quite frankly, they make me nervous when flying them, as the reaction is too slow for a stick-banger like myself.
Anyway, since I bought a FlyCamOne, I have yet to use it for it's intended purpose - Aerial Photography. I have used it a few times for ground to air video, but I think the performance of the cam is really not sufficient for this kind of photography, so now I am on a quest to get a new cam for that and utilize the FlyCamOne for it's intended purpose. The problem is that I really don't have a slow, stable, smooth flying plane to put the cam on.
Enter the Blu Baby Primary Trainer.
I downloaded, printed, and tiled the plans for the plane on Wednesday evening (instead of getting my World Of Warcraft fix for the week). I pulled out a sheet and a half of Fan Fold Foam (FFF) and cut out all of the parts on Thursday afternoon, and after about an hour of building Thursday night, I had what you see in the pic above! The build is very simple. What you see in the pic is a completed airframe minus all electronics and landing gear and it all weighs only 4.75 ounces! I opted to build the KF airfoil wing, rather than the undercambered wing that seems best suited for beginners.
Unfortunately, I have depleted my stockpile of small, brushless outrunner motors that would be best for this plane, so I will be ordering another Blue Wonder 1100kv, 24 gram motor, as that seems to be the motor of choice by the builders in the RCG thread that I linked earlier. I intend to put a GWS 8x4 slowflier prop on it and use another 10 am PowerUp ESC along with a 3S 500 LoongMax Battery. Servos will probably be the 9 gram Hextronics HXT900's (I'll be using only two), and I'll probably use one of my small JR 72mhz receivers since I have a few that are just sitting around.
The goal here is to build a plane with an all up weight (AUW) of less than 12 ounces that will offer smooth flight with a decent flight duration. I plan to put the FlyCamOne on the belly of the plane to get decent air to ground video. I think I'm on the right track!
It may be a bit before this one is completed since I have to order some parts, but I hope to have it in the air within the next few weeks, so stay tuned!
Friday, August 1, 2008
X-20: Maidened!

I got to sneak out for a quick first flight on the new X-20.
OH MY GAAAAAWD!!
With the LoongMax 3s 500 sitting pretty far forward in the nose, the CG came in right within the range as called out in the building instructions. As usual, I had the rates set WAY too high and the flight was a roller coaster (ok, need a little right trim - will compensate on the sticks until I get some altitude. Whoa! Way too much compensation!! Now a little left. Whoa! Too much left!! You get the picture... :D ) I'm glad I forgot to charge the FlyCam to get video of this nonsense as the distraction of it stuffed into my hatband would have probably been too much and I might have destroyed the plane! I needed full focus to keep up with it!
I was able to get it down safely and then proceeded to dial in some low rates - I ended up setting it to 40% of normal and threw it in the air again. MUCH BETTER! This plane performs AWESOME but is certainly not for the weak of heart. Blipping back and forth from low rates to "super" high rates was a ball because the high rates make the little booger roll like MAD!
Half throttle flying was great, as there is still greater than 1:1 thrust to weight ratio and with a little wind, I could probably just kite it all around at around 1/4 throttle.
I estimate about a 5 minute total flight time and the battery was only slightly warm (but hey, this is Texas, so I consider that to be alright). Torque from the prop wasn't too bad, but was present. Had I not been warned to expect it, I'm certain the result would have been carnage! I'm gonna try to steal away tomorrow and fly it some more and also try out a 7x5 "speed" prop.
Final flying weight - 6.2 ounces (177 grams)
Motor: 1700kv Blue Wonder from HeadsUpRC
ESC: 10 amp PowerUP from same supplier
Prop: GWS 7x3.5 DD
Servos: 2x TowerPro SG50 same supplier (you see who I like to deal with, huh?)
Battery: 3s 500 LoongMax from HobbyCity
Construction Material: Foam safe CA, 6mm Depron, Zagi tape for color
Rx: Spektrum AR6100
Tx: "Spektrumized" JR 8103
Plans: www.rcpowers.com
Jason, thanks again for a fantastic design! I'm glad I took good care of my templates. I'll be building a back-up soon 'cause I'm gonna be thrashing the heck outta this plane alot!!
Sunday, July 27, 2008
X-20: Almost Ready To Go!

Well, I got my parts in from HeadsUpRC.com a few days ago, but I was held up a bit getting my newest little plane in the air. You see, it's hot here in Waco, Texas. I don't mean warm - I mean damn HOT! My 11 year old home AC unit went out again and the indoor temperatures in my home got up to 94 degrees! The AC repairman should be out tomorrow afternoon, but I couldn't bear trying to sleep in this house like this again another night, so I spent the day shopping for a small (8000btu) window unit to put in the bedroom to get us by. I got it installed about 2 hours ago, so finally some relief!
Working in the mornings before the temperatures crept up too high, I was able to get the motor, ESC, and radio gear installed. I was also able to manage a nice magnetic canopy hold-down latch to keep the canopy in place in flight, but allow easy removal of the battery for charging.

 Where's the battery, you ask? It's all the way in the front so that I can get the correct CG. The neat thing about using the smaller LoongMax 3s500 battery is that I can save weight. This plane is completely built except for some color on the wings and the control linkages for the elevons. Right now I am at 5.8 ounces (164 grams) all up weight!
On another note, I have been talking with Jason Forsythe, the designer of this plane, and he has advised that he's very close to another very cool design! It's Top Secret right now, but I am hoping to share information on it very soon. I am certain that I will be building one!!
I am hoping that I will be able to maiden this plane this coming weekend, as the wife's work schedule compliments my getting away without a 3 and 6 year old in tow! I am gonna try the old hat-cam again and see if I can pull off some better video than I did earlier with the Cosmic Wind maiden. For what it's worth, I AM in the market for a camera that better facilitates ground to air video than my FlyCamOne. I just haven't yet found the perfect balance between performance and CHEAP! If any of you out there can point me in the direction of a decent (used is okay!) vid cam that allows me to shoot my flights cheaply, and still be able to author my video on my Mac, I will gladly accept your suggestions!!
Saturday, July 19, 2008
X-20 Progress Report

Here is a picture of my X-20 showing the progress I have made thus far. I still have to cut out the canopy, paint it, and attach the elevons and vertical stabs.
I chose to use a 2712-17 1700kv Blue Wonder and 10amp PowerUp ESC from HeadsUpRC.com. I also ordered some 7x3.5 and 7x5 props props along with a pair of TowerPro SG-50 servos. I intend to use my 3s500 LoongMax batteries, so according to Jeff's numbers, the motor should provide 15ozs thrust with 7.5 amp draw and a pitch speed of 46mph with the 7x3.5 prop. If I use the 7x5 prop, I can expect to see 15ozs thrust with an 11 amp draw and a pitch speed of 49mph (but I hafta manage the throttle so I don't burn out the motor or ESC). Not really a bad combo for $31.50!
I hafta say, this has been a FUN little plane to build, and the plans purchased from RCpowers.com are very nice. I honestly can't remember the last time I only had to tile out 4 pages to get a plan for an airplane! I can see an RCPowers LongEZ in my near future!
Jason (RCPowers.com), you are a great designer and I can hardly wait for my gear to come in so I can put this thing in the air.
Here is the link to my motor/esc package:
http://www.headsuprc.com/servlet/th...il?sfs=71fbd898
I'll let you guys know how it performs. I am thinking of throwing a backup together while I'm waiting for my order to arrive, but this time I will utilize EPP for the fuse, but stick with Depron for the wing and verticals.
Thursday, July 17, 2008
My Latest Project: RCPowers X-20

Back in May, Episode #4, Frank and Brian at RCFlightcast did a fantastic interview with Dave Powers from RCPowers.com. Since it's been a while since I've visited his site, I decided to pop over and see what he's got for sale. Dave is known for having some very unique aircraft and the "buzz" is that the plans he has for sale are top-notch and very well designed.
After reviewing his line-up and seeing the vids of his models in action, I decided that I just had to build his X-20 Delta Wing! It seems that this wing has a fairly wide flight envelope and looks like a lot of fun to fly, so I decided to purchase his plans. The ordering process was very easy and PayPal is the medium for which you send the funds. After the transaction was complete, I was immediately able to download the plans.
Let me digress a bit to explain to you how I feel about paying for plans. Forums like RCGroups.com have proven to be a wonderful collaboration venue for sharing plans, and I have pulled off many, many designs that I have built or intend to build. If you're like me and don't really possess much creativity, you will tend to build from others' concepts rather than waste time coming up with your own. The problem with the free plans that are available, is that anyone can post something, but not all designs are "proven", or are great fliers. Don't get me wrong; there are some truly great model designers out there, but I seem to have pretty good luck picking out things that don't really perform as well as expected.
I happen to feel that designers that come up with truly great aircraft that have been proven deserve to have some compensation for their efforts. RCPowers offers a free design that you can download to familiarize yourself with their work (an Extra 300 profile foamie), and after checking this out, I could see that these folks put together very nice designs. When I perused the rest of their line-up, I could see that they are asking a fair price for their plans - not too much dough to spend at all for nicely designed aircraft! The plans I bought for $9.99 for the x-20 look very clean and are very accurate. It would cost me much more money and frustration to mimic this design and get something this nice, so I feel that the money I spent was quite a bargain!
Anyway, to get back on target here, I printed the plans, taped them all together, and then trimmed out the templates. I just happened to have some 6mm Depron (as the plans call out for) so I got busy last night cutting the parts out. I am very excited to get this thing built as it looks like something that will be very fun to fly. At a later date, I will post some photos of the build along with a complete review of this plane with the specs and equipment used.
Thanks to Dave Powers and Jason Forsythe (designer of this plane) for what looks to be a great design!
Please note that the photo I have included in this post is the property of RCPowers.com - I "borrowed" it from their website to show you what the finished product will look like.
Thursday, July 3, 2008
OMG! Hobby People Deliver Big Time!

If you listened to RCFlightCast episode #12, you heard me tell about the new kits that I ordered from HobbyPeople.net. Well, they arrived TODAY! Since I only paid $15 each for the two Rhythm 3D Biplanes and $20 for the WildWing, I honestly wasn't expecting much in the ol' Quality Department. WOW; was I wrong!
All three kits totalled about $55 including shipping and they arrived completely intact. The quality of these airplanes is amazing! I have already perused both of the instruction manuals, and they seem to be quite well written, as well. I bought these for Winter projects, but I may have to go ahead and get started building these within the next week. I foresee pleasurable builds for both!
As a bonus, I can see that the WildWing kit includes the fiber strapping tape used for re-enforcement. I have NEVER purchased as kit that included this stuff! When that late night urge to build has bitten me in the past, it usually meant making a trip to the 24 hour WallyMart to get tape before I could start the build. Not with this kit!
I'll report more after I embark on the building of these; right now I need to finish making my preparations for our Independence Day celebration tomorrow.
Head on over to HobbyPeople.net and check out their wares. If their other offerings are anything close to the quality and value of what I received today, I'm certain that you won't be disappointed!
I'll leave you with two additional pics of the open boxes - note the fuselage on the Bipe as it comes already built and ALL carbon fiber has been included!


Monday, June 30, 2008
Cosmic Wind Maiden
Well, I was concerned that I wouldn't get to get a flight on my new plane today, as rain threatened. However, at around 11:00 this morning, I was able to rush out to one of my sites and try it out!
First off, let me apologize for a couple of things. First off, the video is poor, as is my banter. I am still trying to kick a touch of bronchitis from some sever allergy problems I had a few weeks ago, so it's obvious that I am a little short of breath. Second, I put my FlayCamOnev2 on my head (you'll see in the vid) and I think that my sweaty forehead wreaked havoc with the remote-switch contacts on the back of the camera resulting in an interference with the video (at least that's what I think happened). I'll do some more testing later to find out for sure.
The plane flew wonderfully and only required a click of right aileron trim to set things right. In the vid, you cannot even hear the motor running as it is sooooo quiet! While the power was more than enough to fly the plane nicely, I am quite certain that I will step up to a 3s 350mah pack to see how much better the performance is!
Sunday, June 29, 2008
Hacker Reno Racer - Cosmic Wind

This is my new Hacker Reno Racer. I bought this sometime last year when Hobby Lobby was running them on sale, but it's been sitting in the closet since I received it. I love to build, but it's been a few weeks since I actually threw something together. The itch kind of just hit yesterday, so after perusing my collection of unbuilt toys, I decided to put this one together. The plane is constructed entirely from EPP foam and I found the quality to be quite nice. The instructions were easy to follow, as well, and total construction time was only a few hours.


Following are the specifics of this little jewel:
Wingspan: 790mm (about 31 1/8")
All Up Weight: 218 grams (7.7 oz)
Servos Used: 3 TowerPro SG-90
Motor: 2712-12 1100kv Blue Wonder
Prop: GWS 8060HD
ESC: 10 amp Power Up
Receiver: Spektrum AR6100e
Battery: 2s 500mah LoongMax Lithium Polymer
The construction was straightforward and I encountered no problems whatsoever. The gluing method called out in the manual was thin CA with accelerator, but the only place I used this kind of glue was on the aluminum rod spars that are recessed in the top and bottom of the wing. Everywhere else I used low temperature hot glue. I was afraid that using this glue might result in a higher all up weight than the specified 220 grams, but since mine came in at 218 grams, I expect all will be okay.
I wasn't certain what motor to use, but since I regularly order RC goodies from Jeff Anderson at HeadsUpRC.com, I decided to use the Blue Wonder motor and PowerUp ESC that he offers. Jeff is a great guy and offers outstanding prices on the wares that he carries. Best of all, he won't "rape" you on the shipping. No matter how many things you order from him, shipping is only $2 for the package! He ships via USPS and must race to the Post Office with every shipment, because I have yet to receive ANY package from him in greater than 4 days time. This motor will produce 8.5 ounces of thrust on a 2S battery pack with the propeller that I chose which will offer my slightly greater than a 1:1 thrust to weight ratio with a flying speed of approximately 35mph. I intend this little plane to be a sport flier - not a 3D plane, so this combination should be perfect.
Jeff publishes all of the performance specs for the motors that he sells, and my combination should yield only about a 5 amp draw from the batteries, so flight times should be decent.
I am stuck right now on the homefront with the kiddoes, so a maiden is out of the question. However, if the weather permits, I should be able to maiden first thing in the morning!
I have a FlyCamOneV2 from Hobby Lobby, as well. I am hoping to be able to attach this little camera to the visor on my hat so that I can document the maiden flight. If I can pull this off, I'll post video right here!
Links to my suppliers:
www.hobby-lobby.com (Airplane kit, don't know if they still sell it tho)
www.headsuprc.com (Servos, ESC, Motor, Prop, Prop-Saver)
www.hobbycity.com (LoongMax Lipo battery)
PS - I'm working on building a website for my personal reviews, but until I figure out the ins and outs of web authoring, look for all of my stuff right here!
And don't forget to check out the RC podcast at www.rcflightcast.com !

Tuesday, June 24, 2008
Flat Flea

This one is based on the HyperFlea planform offered by SuperFlyRC.com. I was looking for a light and quick-building indoor flier that would fly really slow in a small space (like our single-court gymnasium) and would not be intimidating for some of our newer fliers. This one fit the bill nicely!
WannaBug

Now here's a little jewel I built a few months back for the winter indoor flying season. It also uses a Blue Wonder motor. Now that our springtime winds have finally fallen off, I'll be flying this one outdoors!
SloFly 28

Here's a quick snapshot of my SloFly 28. The wings and tail are from 9mm EPP and the fuselage is 15mm EPP. Full flying stab is utilized on the horizontal. Motor is a 24gram Blue Wonder.
My HyperFlea

You've prolly heard me on the podcast talk about my SuperFly planes. Here is a pic of my HyperFlea - one of the greatest values you can get at www.superflyrc.com
Tuesday, June 17, 2008
A Wonderful Opportunity
I've been a total junkie over the Radio Control Hobby for 26 years now (airplanes and helicopters). I just recently was given the chance to be a third host to one of my favorite podcasts that covers this subject.
You can listen to this podcast at : www.rcflightcast.com
Thanks go out to Frank and Brian for inviting me aboard!
You can listen to this podcast at : www.rcflightcast.com
Thanks go out to Frank and Brian for inviting me aboard!
Subscribe to:
Posts (Atom)
